Disk Space Cleanup Guidance: NTFS Compression
Many folks are familiar with the concept of zipping files or folders in order to reduce their size. However, Windows has the built-in ability to compress folders and files in a manner that is virtually invisible to users, offering significant space savings without changing how you work.
Quick Summary: NTFS compression is a free built-in Windows feature that automatically compresses and decompresses files behind the scenes, saving disk space without requiring you to manually zip/unzip files.
Why NTFS Compression?
The biggest advantage of using NTFS compression is its complete transparency to users. There’s no need to compress and decompress manually like with stand-alone utilities such as WinZip. Once applied, NTFS compression and decompression occurs automatically in the background, without any user intervention.
NTFS compression is also remarkably flexible in how you can apply it:
- Individual files – Compress just specific large documents
- Folders – Apply to entire directories of compatible files
- Entire drives – Maximize space savings across a complete volume
💡 Pro Tip: As its name implies, NTFS compression works only on NTFS-formatted drives (not with FAT32 or exFAT). To check your drive format, right-click any drive in File Explorer, select Properties, and look for “File system” on the General tab.
When to Use NTFS Compression
Some file types compress much better than others. For maximum space savings, focus on these highly compressible file types:
Best Compression Candidates:
- Office documents (.docx, .xlsx, .pptx)
- Text files (logs, .txt, .xml, .json, .csv)
- Uncompressed images (.bmp, .tiff)
- Database files (.mdb, .accdb)
- Email archives (.pst, .ost)
These typically compress by 30-60%
Poor Compression Candidates:
- Already compressed images (.jpg, .png, .gif)
- Video files (.mp4, .mov, .avi)
- Audio files (.mp3, .aac, .wav)
- ZIP archives (.zip, .rar, .7z)
- Installers (.exe, .msi)
These typically compress less than 5%
Performance Considerations
NTFS compression does involve some performance tradeoffs. Windows automatically decompresses files when you open them and recompresses them when closed. This process consumes CPU resources, which can impact performance when working with frequently accessed files.
For optimal results, apply NTFS compression to:
- Folders containing infrequently accessed documents
- Archive folders with reference materials
- Old project files you need to keep but rarely open
Avoid compressing:
- System files and program folders
- Files you access multiple times daily
- Files that already have poor compression ratios
How to Apply NTFS Compression
Compressing an Entire Drive
You must be logged on as an administrator or a member of the Administrators group to complete this procedure:
- Open File Explorer (or My Computer in older Windows versions)
- Right-click the drive you want to compress, and then click Properties
- On the General tab, check the Compress this drive to save disk space option
- Click Apply, then OK
- In Confirm Attribute Changes, select whether to apply to subfolders and files
Note: Compressing an entire drive can take significant time depending on its size.
Compressing Individual Files or Folders
- Open File Explorer (or My Computer in older Windows versions)
- Navigate to the file or folder you want to compress
- Right-click the item and select Properties
- On the General tab, click Advanced
- Check Compress contents to save disk space
- Click OK twice
- If compressing a folder, choose whether to apply changes to subfolders and files
Maximizing Your Results with FolderSizes
A key component of using any compression mechanism effectively is understanding how your disk space is currently being allocated. FolderSizes helps you:
- Identify exactly which files and folders are consuming the most space
- Find the best compression candidates based on file type and size
- Discover duplicate files that could be deleted instead of compressed
- Analyze compression ratios to see how much space you’ve saved
- Monitor disk space usage over time to prevent future storage issues
Searching Offline File Systems
FolderSizes 7 introduced an powerful feature called Snapshots, which allow you to capture the metadata state of an entire file system for further analysis at a later date and time. Snapshots are useful for a wide variety of purposes, but today we’ll focus on the ability to search a file system even after it’s no longer online.
We’ll start by first using the Snapshot feature within FolderSizes 7 to capture the state of a file system point. Please note that Snapshots can be generated from any available file system node – a drive, folder, network share, or even multiples of any of the above. For this example, we’ll capture the entirety of the host system’s D drive.
Start by selecting Snapshot | Create New Snapshot from the main window within FolderSizes.

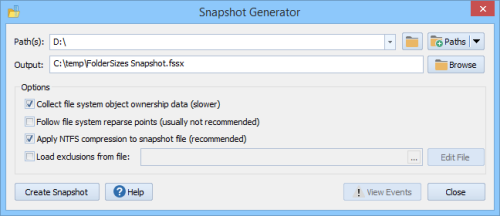
The Snapshot Generator window will appear. As mentioned above, we’re capturing the state of the local data drive (with a drive letter of “D”) in this example, and writing the resulting Snapshot (.fssx) file to a temporary folder on the local C drive.

Clicking the Create Snapshot button will begin the capture process. The amount of time required and the size of the resulting Snapshot (.fssx) file will depend upon the amount of data stored on the D drive (in addition to other variables such as disk speed, etc.). In the case of our example, the FolderSizes Snapshot feature captured the state of 11,238 folders and 1,516,277 files within an elapsed time of 3 minutes and 26 seconds.
I would like to point out that FolderSizes has built-in support for scheduling the generation of Snapshots. This not only allows the capture to take place during non-business hours (if desired), but also easily enables the accumulation of regular Snapshot (.fssx) files for later use (e.g. trend analysis, data archival, etc.).
Now that we have a Snapshot (.fssx) data file, it can be used in place of the equivalent live file system within FolderSizes. You can generate folder reports, file reports, and searches against the Snapshot data file, but in this case we’re going to try a search.
We start the FolderSizes Search tool and use the New Path button to browse for our newly created Snapshot file.

As you can see above, we’ve designated the Snapshot file as a search path. In fact, you can easily search multiple Snapshot files using this method just by adding them to the list. You can even search a combination of Snapshot files and live search paths at once.
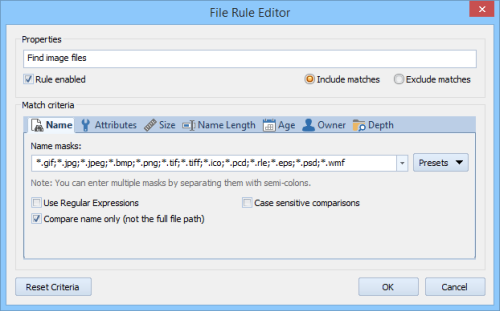
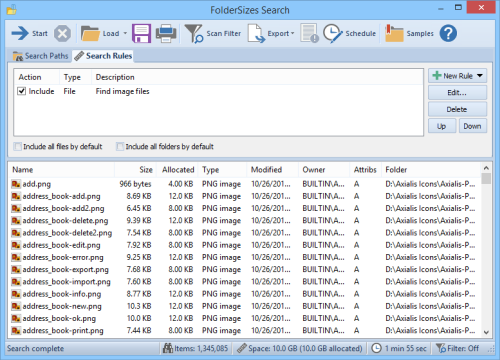
Now we’ll switch to the Search Rules tab and define a simple file-based search rule that will find any image files within our Snapshot.

With that done, we can close the File Rule Editor and Start the search. Since the Search itself is reading from a single, consolidated Snapshot, it will generally execute very quickly. In the example scenario above, the search found 1,345,085 image files for a total of 10 GB of disk space within 1 mins and 55 seconds.

And so there you have a simple, step-by-step example of how to capture the state of a file system node as an offline Snapshot (.fssx) file, and later search it at will even when the target file system node is no longer available.
Benefits of this technique include:
- Provide reporting and analysis capabilities to other users that lack access to the target file
system(s) - Create a history of file system state that can be used for historical review or investigation
- Generate reports even when the target file system(s) are offline or otherwise unavilable
In future articles, we’ll discuss additional capabilities exposed by this amazingly powerful and unique capability of FolderSizes.
FolderSizes 7.5 is Released
Key Metric Software is proud to announce the public availability of FolderSizes 7.5.
OVERVIEW
This release continues to build on our position as a world leader in disk space analysis software by adding a number of compelling new features and enhancing existing ones.
New features and improvements:
- New disk usage history tracking capabilities
- Percentage growth indicator now available for disk-based reports and views
- Disk reports can now be scheduled for periodic execution
- The trend analyzer can now consume Snapshot (.fssx) files directly
- Improved column sizing for reports exported in Excel file format
- New ability to apply NTFS compression to text-based report export files
- Added a new “Files (Immediate)” column to the folder report detail view
- Scheduling assistance integrated into Disk Reporter, File Report, and Search tools
- File report ranges can now be reset to their default values
- Numerous user interface enhancements
- Minor bug fixes
To better introduce the new disk history tracking capabilities of FolderSizes 7.5, we have written a technical overview that may be of interest to you.
Tracking Disk History with FolderSizes 7.5
UPGRADE ELIBILITY
FolderSizes v7.5 is a free upgrade for all v7 license holders. Version 7 license owners can simply download the new release and install it.
If you’re still running an older release of FolderSizes, you’re missing out on some amazing new capabilities. Please consider upgrading your FolderSizes license today:
https://www.foldersizes.com/order/upgrade
CONTACT US
Please don’t hesitate to reach out to us if you have questions, comments, or suggestions. We love hearing from our customers. Just send an email to support@foldersizes.com, and we’ll get back to you quickly.
Introduction to FolderSizes Snapshots
We’ve published a white paper on one of the most useful new features introduced in FolderSizes 7 – the ability to take file system snapshots, from which any report (or even search) can be executed in the future.
FolderSizes 7 is Released
Key Metric Software is proud to announce the release of FolderSizes 7, the latest version of our world-class disk space analysis, reporting, and visualization software.
FolderSizes 7 has a wide range of new capabilities, including:
- File system snapshot capability (Pro edition only)
- Extensive support for exporting reports to MS Excel
- New Disk Reporter tool for custom local and network drive reports
- Drag and drop (plus cut, copy, & paste) support within the folder report view
- New ability to export all File Reports at once (as a single report)
- Numerous enhancements to scheduling and command line interfaces
- Improved, smarter Trend Analyzer capabilities
- Significant performance enhancements in Search, File Reports, etc.
- New, domain-level network share discovery features
- Many powerful user interface improvements
- Much, much more (over 50 new features and enhancements)!
Please feel free to download FolderSizes 7 today:
https://www.foldersizes.com/download
Note: Installing FolderSizes 7 will not automatically remove previous major version installations. This is done to allow users an opportunity to evaluate FolderSizes prior to switching to it. Please feel free to un-install previous releases of FolderSizes before or after installing v7 (if you wish).

